7 things I learned this year about DIY reupholstery
It’s that time of year when, formally or informally, many of us begin to assess life and think about our goals for the year ahead. Last year I had only one goal on my New Year’s resolution list: have a baby. And if you’ve had a baby before you know that’s about all you can really expect of yourself. Anything achieved beyond that is a bonus! So I’m pretty happy to look back and see some of the stuff I achieved this past year, even while taking care of my little ones – including beginning the adventure of DIY reupholstery. Through this process I’ve learned a lot and gained some awesome new furniture for my home at a reasonable price. Here are a few tips for you, if you think you might give it a whirl…

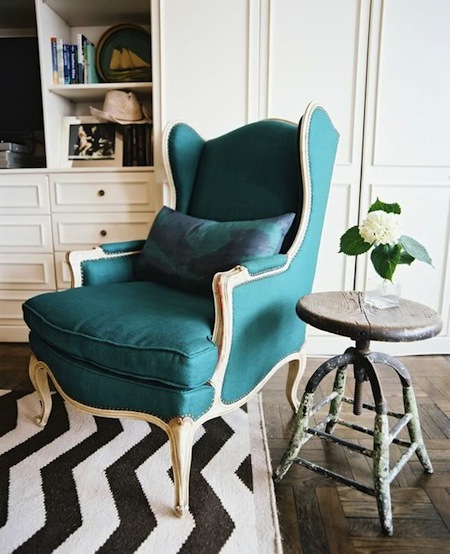
Designer Kimberley Renner. Photograph from Martha Stewart Living. Here’s an example of how great a wingback chair can look. Unfortunately mine is far from finished…
1. Start small. My first project was (still is) a wingback chair. I affectionately call it “the beast” – it’s large, curvy, and no simple task. It’s taken a lot of creative problem solving, redoing things, letting go of my dreams of perfection, and it’s still not done. Boo. However over the past year of working on this chair I’ve completed three other chairs and a couch. I just picked the wrong project to start with. If you’re really timid, try a small bench or a dining chair with an upholstered seat. Get used to thinking through an upholstery project and build up to the bigger pieces.

A dining chair makeover by designer Eddie Ross
2. Start cheap. This is where Used.ca comes in. Buy a cheeeeap chair from your local Used.ca site. My wingback chair was $10, so it would probably be OK if I abandoned it. Or destroyed it. Or decided to pay an upholsterer to do it right. (I considered all of these things, but I’m too stubborn to give in.)
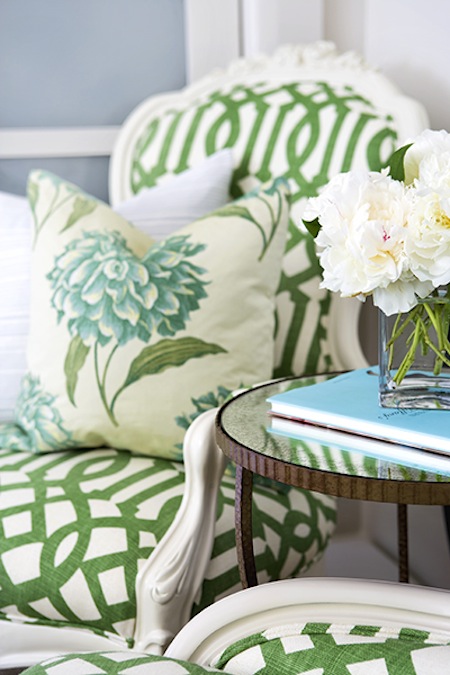
Designer Ashley Wick, photograph from Lonny Magazine. When starting out on a bigger project, use solid colours instead of printed fabrics so that you don’t need to worry about lining patterns up or keeping them straight.
3. Start clean and solid. I didn’t want to delve into rebuilding a frame, or re-webbing a seat, or shaping new foam, so I look for chairs that are already sturdy and relatively clean (just ugly, outdated or worn).

4. Start together. I live in a 2 bedroom apartment with 4 people, so I don’t have a ton of space to spare. So I was delighted when my friend Lindsey asked if I wanted to bring a chair over to her house and dedicate a room in her basement to our upholstery projects and work on them together. Not only has the space been so valuable, the friendship has been priceless. To pass the endless hours of staple removal over good conversation and chocolate is a great thing. And to have someone to bounce ideas off of, to help brainstorm solutions with, and to hold that fabric in place is so helpful.

Lindsey’s first completed chair – a cute vintage rocker.
5. Start inspired. The trick to seeing an old ugly furniture piece through to its glorious finish is to have vision. Know what you want to achieve. You can do this by collecting inspiration pictures. (I keep an inspiration file on Pinterest) Surf online design magazines or blogs, saving pictures of furniture you like. Take a camera into stores and snap pictures of furniture that you love (but wouldn’t pay that much money for!). Sort through them and figure out what shapes and colours, and patterns you are drawn to. For example I love classic or antique chair shapes done in modern colours and patterns.
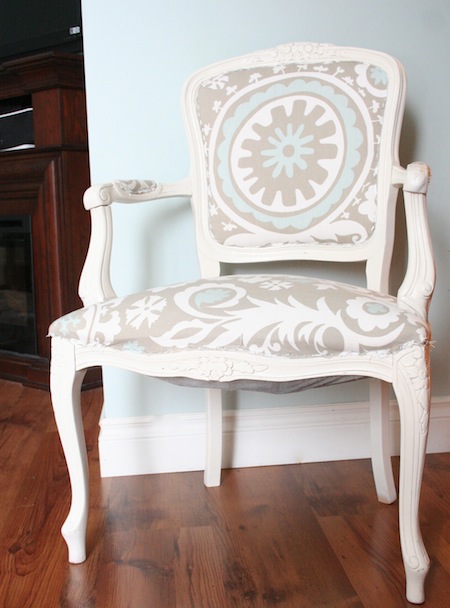
Design by Samantha Pynn, photograph by Virginia MacDonald. Here’s an example of a classic french style chair with modern colours and prints.
6. Start informed. There are tons of bloggers out there who’ve tried their hands at reupholstery projects of all kinds. Read up on their experiences to gauge if you’re up for a similar project, and how you might go about it. You don’t have to follow their methods exactly, but it’s a good place to start. Some of my favourites are Little Green Notebook and Centsational Girl – but you could do a Google search for whatever project type you’re doing (I like to include “blog” in the search title) and find many industrious, creative people’s handiwork.
I discovered when working on this chair that I find furniture that is only partially upholstered much easier to do
7. Start equipped. As you get started it pays to have good tools. But you don’t necessarily want to pay for good tools. I’m super cheap, so I didn’t go out and buy anything, I just tried to use what was already in the toolbox. As far as possible try to borrow tools for your first upholstery project. Then if you think it’s something you’ll continue to do it’s worth investing in a couple good tools. For example I prefer to just use a flathead screw driver and a pair of pliers to remove staples, but found upgrading to an air compressor staple gun completely worth it. And some of the special upholstery needles out there for sewing corners or adding button tufting will make your life much easier. So look around at what’s out there and buy things as you discover you need them.
Hopefully my experience will help you delve into a reupholstery project of your own this new year!
Useful links
Find used living room furniture
Justine Taylor
I'm the wife of one amazing man, a mom of two wonderful little kiddos, and I love interior design, painting, pottery, diy-ing (is that a verb?) running, watching football, singing, the outdoors, ...and so many other things about this wonderful life I've been given!
Grace
You did a great job on all the chairs! But it just looks so darn hard to do!
Grace
You did a great job, all the chairs look great.