Campfire how to: The art & science
There are two ways to make a campfire: the way that results in a fire and the way that doesn’t.
Given the option, people unanimously choose the first way, yet it seems as though the second result occurs more often than it should.
Think about it; how many times have you witnessed someone madly fanning a smouldering mess with a paper plate, or blowing-cheeks until their face turned blue?
This is surprising to me, although I’m not trained in fire-making, I have many times found myself in situations requiring a campfire to be made; from helping my dad when I was five-years old, to teenage cottage-weekends with friends, to winter survival camping in northern Alberta. Essentially, I learned to make campfires through necessity and repetition. To use a classic Canadian motto, I’ve always just had to “Get’er done.”
Sometimes fire-building is difficult and occasional failures are inevitable. Conditions can be so wet or the wood so green, that even the most skilled survivalist would struggle. That’s not what I’m talking about though, what I’m talking about is making a simple, quick fire in just a few minutes using only an axe, a match and a couple of crumpled sheets of paper; a campfire with good heat, strong flames and great coals.
So here’s my advice and without doubt, some people will disagree. Just ignore them and I promise that with the following steps, you will become the fire master you’ve always wanted to be.
Campfire how to:
First, let me explain the general approach I take to fire-building. I use a hybrid of the tee-pee and the log cabin method: a log cabin that slopes inward like a pyramid. My theory is that this cabin shape is stable and doesn’t collapse like a tee-pee but still has a slope that catches the flames. Though I also like it simply because it’s house-shaped and everyone knows that houses catch-fire and burn to the ground extremely easily. So why not make my campfire in the shape of a house… or a pyramid-cabin?
With that, here is my simple campfire how to:
* You will need: a few logs, an axe or hatchet, paper/flyers/newspaper and matches or a lighter.
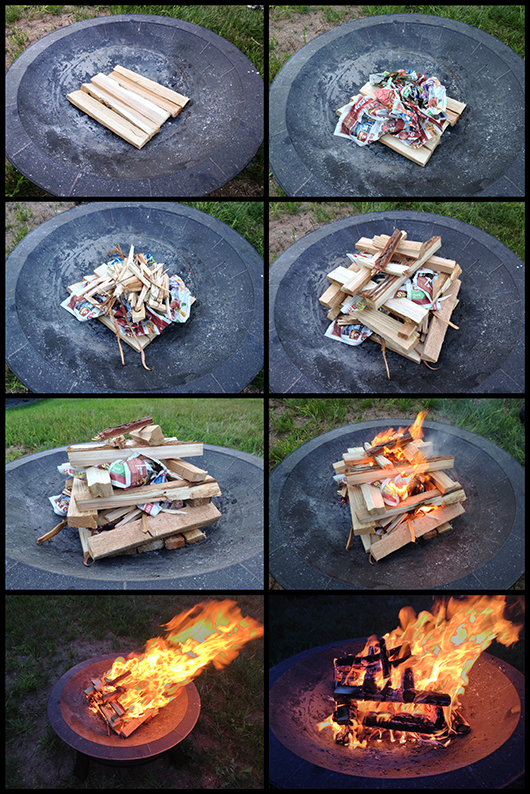
Image Credit: M. Edward Johnston
- Grab a few of the driest logs you can find. With an axe, split into medium sized kindling pieces, roughly 1 to 1.5 feet long and about 2 to 3 inches in width. Do this until there are a dozen or so pieces
- Take one of the pieces and using the axe, chip-off small chunks of mini-kindling. All sorts of sizes and shapes of this mini-kindling are good. Do this until you have about enough to overflow your hands if you cup them together
- Take five or six pieces of kindling and wherever you’re making the fire, line them up side-by-side. This forms a base for your fire that gets the rest of the kindling off the ground. This helps if the ground is wet and quickly makes a layer of coals for cooking
- Loosely crumple a sheet or two of paper and place on the centre of the base
- Dump half of the mini-kindling onto the crumpled paper
- Build your pyramid-cabin. Lay two pieces of large kindling across opposite sides of the base. Then stack two more pieces on top of the first pieces, placing them the opposite way, so as to start building the pyramid-cabin vertically. Keep doing this, making a new layer each time but be sure to move each set of kindling closer and closer to the middle of the pyramid-cabin. This creates the pyramidal hybrid tee-pee/log-cabin shape
- When you get about half way, place another sheet of crumpled paper in the middle of the pyramid-cabin and dump the remaining mini-kindling on top of the paper
- Finish building up-and-in until you can only lay a single piece of kindling across the top
- Grab a match and light the paper at the bottom of the pyramid-cabin
- Stand back and admire the glory of a well-made campfire!
If you have a unique approach to fire-making or have a funny story to tell, please share it with us in the comments below. As well, if you’re due for a weekend away and are short on supplies, an array of paraphernalia is available on the UsedEverywhere sites, for example:
- Free pallets, which are great for firewood, on UsedVictoria.com
- $20 Hatchet on UsedRegina.com
- $25 cooper fire pit on UsedPEI.com
Mark Johnston
Having lived on both coasts and smack-dab in the middle of the prairies, Mark believes himself to be quite the well-rounded Canadian. That being said, he sure does struggle with appropriate regional diction. Remind him again: Is it pronounced scallop or skahllop?
Maxine
Hi Mark,
Thank you for this article.
Some people may scoff at needing a guide to start a campfire, but on a recent camping trip with my friends I can attest to the fact that starting a campfire is not as easy as one would think!
Your tips, steps and accompanying images, were valuable to me – and no doubt with be valuable to others.
Many thanks,
Maxine
Mark
Oops, see my reply below!
Mark
You’re more than welcome – glad it helped out! I haven’t made a fire this year yet but I’m really looking forward to it – especially since my little girl is about two years old now. She should love it!
Lee Hills
Mark, like your article. You might like our IncinerGrate product that maintains the teepee form throughtout the fire. Fires are a easy to build/start and maintain.
Mark
Thanks, Lee! I’ll check out the product.